How to brew pour over coffee doesn’t need to be complicated, especially when you’re just starting out.
You might have seen videos with special kettles, exact timings, and swirling techniques that make it feel intimidating — especially if you’re just trying to make a good cup of coffee at home.
Here’s the reassuring truth:
Pour-over doesn’t need to be complicated to taste good.
This beginner guide walks you through a simple, repeatable way to brew pour-over coffee, explains why each step matters, and shows you how to adjust taste without overthinking it.
What pour-over coffee actually is (in simple terms)
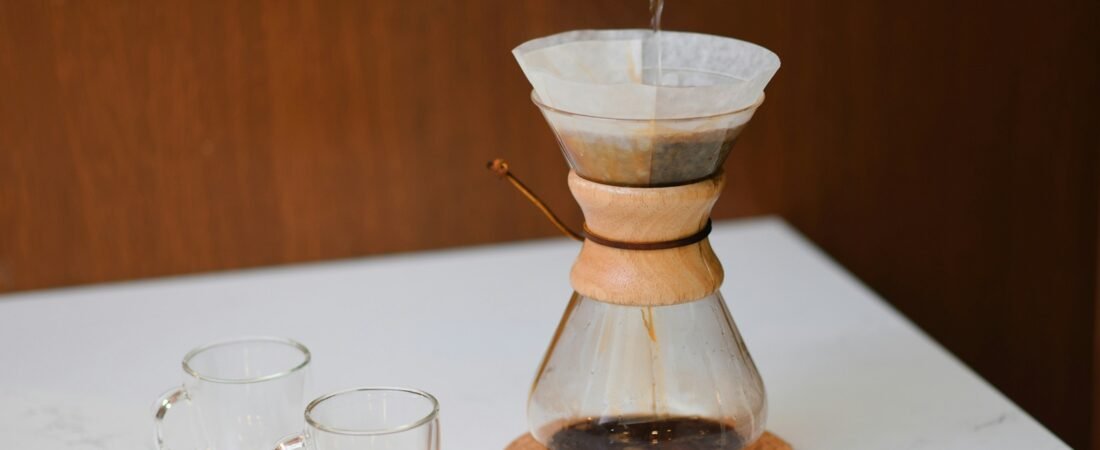
Pour-over is a manual brewing method where hot water is poured over ground coffee, which then drips through a filter into a cup or carafe. This same process works across most pour-over brewers, including popular styles like the V60, Chemex, and similar drippers.
What makes pour-over different from other methods is:
- You control the water
- The coffee brews gradually
- Flavour tends to be cleaner and lighter
It highlights subtle flavours, but that doesn’t mean it has to be delicate or weak.
Pour-over is just one of several beginner-friendly brewing methods, each with its own feel and routine.
What you need to get started (keep it minimal)
You don’t need a perfect setup to make pour-over coffee.
At a minimum, you need:
- A pour-over dripper
- Paper filters that fit your dripper
- Fresh coffee beans (or freshly ground coffee) – If you’re unsure whether grinding at home is worth it yet, this guide on do you need a coffee grinder? explains when it actually makes a difference.
- Hot water
- A mug or carafe
Helpful but optional:
- A burr grinder
- A kettle with a steady pour
- A scale (nice, not mandatory)
If you already have basic gear, you’re ready to start.
A simple beginner ratio that works
A good starting point for pour-over is:
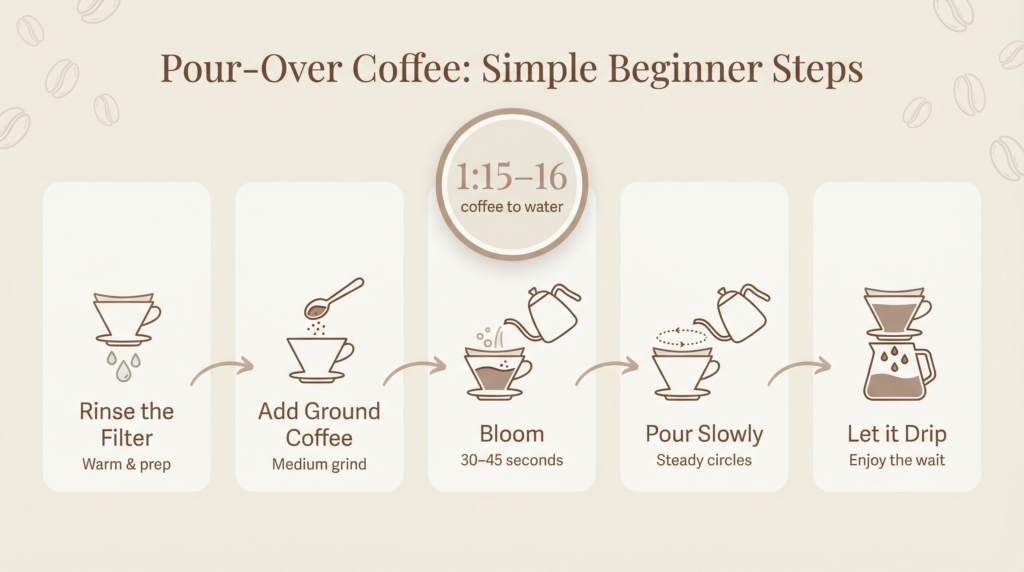
1 gram of coffee to 15–16 grams of water
If you don’t use a scale:
Use 1 level tablespoon of coffee per 120–130 ml of water
This doesn’t need to be exact.
This gives you a balanced cup that’s easy to adjust later. It’s explained more fully in our water ratio guide.
Step-by-step: how to brew pour-over coffee
This process is forgiving. Don’t aim for perfection — aim for consistency.
Step 1: Heat the water
Bring your water to a boil, then let it sit for about 30 seconds.
The water should be hot, but not aggressively boiling.
Step 2: Rinse the filter
Place the paper filter in the dripper and rinse it with hot water.
This:
- Removes paper taste
- Preheats your dripper and cup
Discard the rinse water.
Step 3: Add coffee grounds
Add your ground coffee to the filter and gently level it.
For grind size:
- Aim for something like coarse sand
- If it looks powdery, it’s too fine
- If it looks chunky, it’s too coarse
Step 4: Bloom the coffee
Pour just enough water to wet all the grounds.
Wait 30–45 seconds.
This step allows trapped gases to escape and helps the coffee extract more evenly.
Step 5: Continue pouring slowly
Pour the remaining water slowly and steadily.
You can:
- Pour in small circles
- Or pour gently in the centre
Both are fine. What matters more is not rushing.
Step 6: Let it finish dripping
Once all the water has passed through, remove the dripper.
Your coffee is ready.
What good pour-over should taste like
A well-brewed pour-over should taste:
- Clean
- Balanced
- Not harsh
- Not sour
It won’t be as heavy as French press, and that’s normal.
If it tastes good to you, you’ve done it right.
Common beginner mistakes (and why they’re normal)
If you’re not sure whether taste issues are coming from grind size or brewing, this grind size troubleshooting guide breaks it down simply.
Coffee tastes bitter
Usually means:
- Grind is too fine
- Brew took too long
Try a slightly coarser grind next time.
Coffee tastes sour
Usually means:
- Grind is too coarse
- Not enough extraction
Try a slightly finer grind or pour a bit slower.
Coffee tastes weak
Usually means:
- Too much water
- Too little coffee
Adjust the ratio before changing anything else.
How to improve over time (without overthinking)
Once you’re comfortable:
- Change one thing at a time
- Keep notes mentally (no spreadsheet needed)
- Focus on what tastes better to you
Pour-over rewards small, calm adjustments.
Do you need a special kettle or scale?
No — not at the beginning.
They can help with consistency later, but they’re not required to make good coffee.
Your attention matters more than your equipment.
Beginner reassurance (important)
If your pour-over isn’t perfect the first few times, that’s normal.
Good pour-over coffee comes from:
- Practice
- Familiarity
- Small adjustments
Not precision or expensive gear.
Final thought
Pour-over coffee isn’t about control — it’s about awareness.
Pay attention, stay relaxed, and let your taste guide you.
That’s how good coffee habits actually form.
What’s next?
Once you’re comfortable with pour-over, the next helpful steps are:
- Grinding fresh for more flavour
- Learning a second brew method for comparison
- Understanding ratios more deeply
You don’t need to rush any of it.