A moka pot is one of the simplest ways to make strong, rich coffee at home without an espresso machine — and this moka pot beginner guide will walk you through everything step by step. If you’ve never used one before, this guide covers what it is, how it works, and how to brew your first cup without making the most common beginner mistakes.
What Is a Moka Pot?
A moka pot is a stovetop coffee maker that uses steam pressure to brew strong, concentrated coffee. It was invented in Italy in 1933 by Alfonso Bialetti — the brand whose name became synonymous with the product — and has been a staple of Italian homes ever since. You can explore the full history on the Bialetti website.
It’s often called a “stovetop espresso maker” — though the coffee it produces isn’t technically espresso (which requires 9 bars of pressure). What you get is something close: a rich, bold, concentrated cup that’s significantly stronger than French press or drip coffee.
If you want strong coffee without spending hundreds of dollars on an espresso machine, a moka pot is the most affordable way to get there.
How a Moka Pot Works
A moka pot has three parts:
Bottom chamber (boiler) — where you add water. Fill it to just below the safety valve — a small metal nub on the inside wall. Never fill above it.
Filter basket — sits inside the bottom chamber. You fill this with ground coffee. Don’t tamp or press the grounds down — just level them off.
Top chamber — screws onto the bottom. This is where the brewed coffee collects. It has a rubber gasket and a metal filter plate that keeps grounds out.
When you place the assembled pot on the stove, the water in the bottom chamber heats up, creates steam pressure, and forces the hot water up through the coffee grounds and into the top chamber. The whole process takes about 4-5 minutes.
What You Need to Get Started
- A moka pot (see our Best Moka Pot for Beginners guide for recommendations)
- Medium-fine ground coffee — finer than drip, coarser than espresso
- A stove — gas or electric both work
- Water
- A coffee mug
That’s it. No special equipment, no electricity (beyond the stove), no paper filters.
Step-by-Step: How to Use a Moka Pot
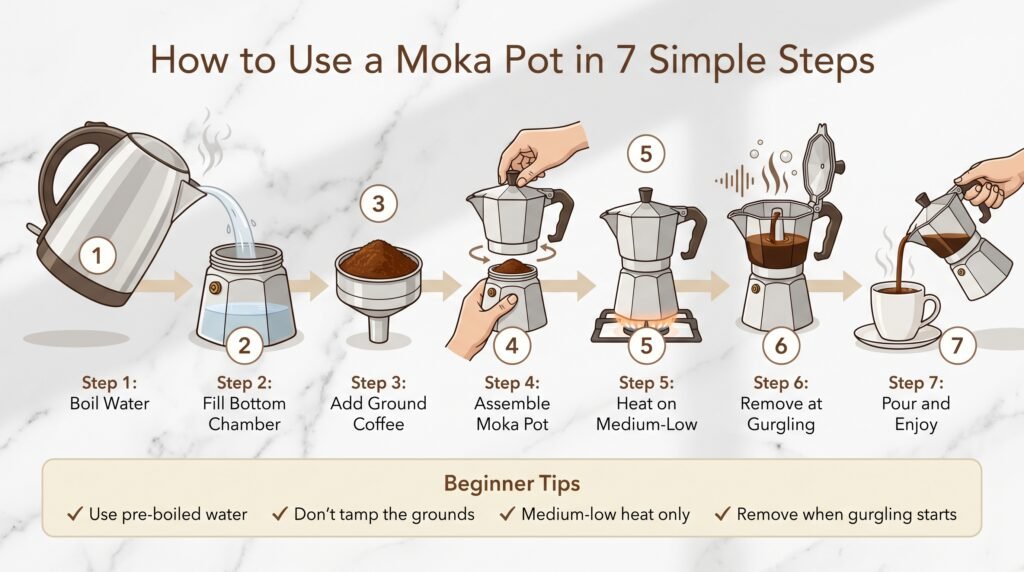
Step 1 — Boil your water first
This is the most important tip most beginner guides skip. Use pre-boiled water in the bottom chamber rather than cold water.
Starting with hot water means the moka pot spends less time on the heat before brewing begins. Cold water forces the coffee to sit on the hot stove for longer while the water warms up — which bakes the grounds before extraction starts and leads to bitter, burnt-tasting coffee.
Boil a kettle, let it rest for 30 seconds, then fill the bottom chamber.
Step 2 — Fill the bottom chamber
Pour the hot water into the bottom chamber up to just below the safety valve. The safety valve is a small metal nub on the inside wall — never cover it with water. It’s a pressure release mechanism and covering it is a safety risk.
Step 3 — Fill the filter basket with coffee
Add medium-fine ground coffee to the filter basket. Fill it level to the top — the basket is designed to hold exactly the right amount. Don’t press or tamp the grounds down. Tamping creates excess pressure and can make the coffee bitter or cause the moka pot to malfunction.
Level the grounds off with your finger or a small spoon and place the basket into the bottom chamber.
Step 4 — Assemble the moka pot
Screw the top chamber onto the bottom firmly. Use a cloth or oven mitt to hold the bottom chamber — it will be hot. A tight seal is important for building the right pressure inside the pot.
Step 5 — Heat on medium-low
Place the moka pot on the stove over medium-low heat. This is the most common mistake beginners make — using too high a heat. High heat forces extraction too quickly and produces bitter, burnt coffee. Medium-low heat gives you a slower, more controlled brew and a noticeably better result.
Keep the lid open so you can watch the coffee rise into the top chamber.
Step 6 — Remove from heat when it starts to gurgle
You’ll hear the coffee start to flow — a gentle hiss followed by a gurgling sound. When the gurgling starts, remove the pot from the heat immediately. The gurgling means the water is almost exhausted and you’re at risk of over-extracting.
Don’t wait for it to stop — take it off as soon as it starts.
Step 7 — Pour and serve immediately
Moka pot coffee is best drunk immediately. Pour it into a prewarmed mug and drink it straight, or use it as a base for milk drinks like a simple latte or cappuccino.
Getting the Grind Right
Grind size is the variable that matters most for moka pot coffee.
Medium-fine is the target — finer than drip coffee but coarser than espresso. Think table salt, not powdered sugar.
- Too coarse — water flows through too fast, coffee tastes weak and sour
- Too fine — water struggles to flow through, coffee tastes bitter and over-extracted, and you risk damaging the gasket with excess pressure
If you’re buying pre-ground coffee, ask for a moka pot grind specifically. Don’t say “espresso” — they’ll grind too fine.
If you’re grinding at home, our Best Beginner Coffee Grinders Under $150 guide covers grinders that give you precise enough control for moka pot brewing.
Common Moka Pot Mistakes
The most important rule in this moka pot beginner guide: always start with hot water. Using cold water forces the grounds to sit on the heat too long before extraction begins — and the result is bitter, burnt coffee.
Tamping the grounds — don’t press the coffee down in the basket. Level it off gently. Tamping creates excess pressure and leads to bitter coffee.
Using high heat — medium-low heat always. High heat rushes extraction and produces a burnt, bitter result.
Leaving it on the heat too long — take it off the heat as soon as you hear gurgling. Waiting until it stops means you’ve over-extracted.
Not cleaning it properly — rinse all parts with warm water after each use. Don’t use soap — it strips the natural seasoning that builds up inside the aluminium and actually improves flavour over time. Let all parts air dry fully before reassembling.
Not seasoning a new pot — if you’ve just bought a new moka pot, run 2-3 brew cycles with plain water (no coffee) before your first real brew. This removes the metallic taste that new aluminium pots can have.
Moka Pot vs French Press: What’s the Difference?
These are two of the most popular manual brewing methods for home brewers. Here’s how they compare:
| Moka Pot | French Press | |
|---|---|---|
| Strength | Strong and concentrated | Rich and full-bodied |
| Taste | Bold, espresso-like | Smooth, oily, complex |
| Sediment | None | Some fine sediment |
| Brew time | 4–5 minutes | 4 minutes |
| Equipment | Stove required | Just hot water |
| Difficulty | Slightly more technique | Very forgiving |
| Best for | Strong coffee lovers | Full-flavour, easy brewing |
If you want rich, smooth, full-bodied coffee — French press is easier and more forgiving. If you want something stronger and more espresso-like — a moka pot is the way to go.
Our Beginner Coffee Brewing Methods Compared guide covers this in more detail if you’re still deciding which method suits you.
What Coffee to Use in a Moka Pot
Medium or dark roast beans work best in a moka pot. This is one of the most important tips in any moka pot beginner guide — the concentrated brewing method amplifies flavour, so bean choice matters more than with other methods. Lighter roasts can taste sour or sharp, while medium and dark roasts produce the bold, rich result most people are looking for.
Avoid very light roasts until you’re comfortable with the brewing process. Start with a reliable medium roast and adjust from there.
Our Best Coffee Beans for Beginners guide covers beginner-friendly options that work well across multiple brewing methods.
Moka Pot Sizes: Which One Should You Buy?
Moka pots are sized in cups — but each “cup” equals about 50-60ml of concentrated coffee, not a standard 8oz mug. A 3-cup moka pot makes roughly one standard mug of strong coffee.
| Size | Volume | Best For |
|---|---|---|
| 1-cup | ~50ml | One small espresso-style shot |
| 3-cup | ~150ml | One standard mug |
| 6-cup | ~300ml | Two mugs or one large mug |
| 9-cup | ~450ml | Two to three mugs |
For most solo home brewers, a 3-cup or 6-cup is the right starting point. The 3-cup makes a single concentrated serving; the 6-cup gives you a bit more flexibility.
Cleaning and Maintenance
After each brew:
- Disassemble all three parts once the pot has cooled
- Rinse with warm water — no soap
- Let all parts air dry fully before reassembling
Don’t: Put your moka pot in the dishwasher — it strips the natural seasoning and can damage aluminium models.
Check the gasket regularly: The rubber gasket between the top and bottom chambers wears out over time. When it starts to feel hard, cracked, or the pot begins to leak during brewing, replace it. Replacement gaskets are inexpensive and available on Amazon — search for your specific moka pot model.
Replace the gasket annually if you brew daily. It’s a small maintenance step that keeps the pot working properly for years.
Frequently Asked Questions
What does a moka pot beginner guide cover? A moka pot beginner guide covers the basics of how a moka pot works, the right grind size to use, step-by-step brewing instructions, common mistakes to avoid, and how to clean and maintain your pot. This guide covers all of those — plus a size guide and a comparison with French press brewing.
Is this moka pot beginner guide suitable for all stove types? Yes — this moka pot beginner guide covers brewing on both gas and electric stoves. The main exception is induction hobs, which require a stainless steel moka pot or an induction adapter disc since aluminium isn’t magnetic. All other steps and tips apply regardless of your stove type.
How long does it take to learn from a moka pot beginner guide? Not long at all. Most people get a decent cup on their second or third brew. The key variables — water temperature, grind size, and heat level — are easy to dial in once you understand why they matter. This moka pot beginner guide covers all three in detail so you can skip the trial and error.
What is the biggest mistake covered in this moka pot beginner guide?
Using cold water in the bottom chamber. It’s the single most common beginner error and the one that causes the most bitter, burnt-tasting coffee. Always start with pre-boiled water — it makes a noticeable difference from your very first brew.
Is moka pot coffee the same as espresso? No — and this is one of the most common questions in any moka pot beginner guide. Moka pot coffee is strong and concentrated but not technically espresso.
Why does my moka pot coffee taste bitter? The most common causes are: heat too high, grounds tamped too firmly, or grind too fine. Try reducing the heat to medium-low, levelling the grounds without tamping, and adjusting to a slightly coarser grind.
Why does my moka pot coffee taste sour or weak? Usually caused by a grind that’s too coarse or heat too low, leading to under-extraction. Try a slightly finer grind and make sure you’re using medium-low rather than very low heat.
Do I need to season a new moka pot? Yes — run 2-3 brew cycles with plain water before your first real brew. This removes the metallic taste that new aluminium pots can have and prepares the pot for regular use.
Can I use a moka pot on an induction hob? Aluminium moka pots don’t work on induction hobs — aluminium isn’t magnetic. You need a stainless steel moka pot or a separate induction adapter disc. Bialetti makes stainless steel versions specifically for induction hobs.
How do I know when the moka pot is done? Listen for a gentle hissing followed by a gurgling sound — that’s your cue to remove it from the heat immediately. The gurgling means the water in the bottom chamber is almost exhausted.
How often should I replace the gasket? If you brew daily, check it every 6-12 months. Replace it when it starts to feel hard or cracked, or when you notice leaking during brewing. Replacement gaskets are inexpensive and easy to fit.
Continue Learning
- Best Moka Pot for Beginners → which moka pot to buy before you start brewing
- Bialetti Moka Express Review → the most popular moka pot in the world, reviewed honestly
- Beginner Coffee Brewing Methods Compared → how moka pot stacks up against French press, pour-over, and AeroPress
- Best Coffee Beans for Beginners → which beans work best across all brewing methods
- Best Beginner Coffee Grinders Under $150 → getting the grind right makes the biggest difference
- How to Use a French Press → if you want to compare moka pot to French press brewing side by side
- Why Does My Coffee Taste Bitter? → troubleshooting guide if your moka pot coffee tastes off